Monday, March 26, 2012
Amedeo Modigliani Elongated Portraits
Second graders just recently completed their art history unit with this lesson on the painter, Amedeo Modigliani. For this lesson students studied how he was influenced by the Mannerists. We compared and contrasted some of his portraits with The Madonna of the Long Neck by the Italian painter Parmigianino,
This project took two 45 minute sessions.
Day 1: Together we drew the portrait very lightly with pencil. We started by tracing a pattern and elongating the features.We reviewed complementary colors and used them to mix neutral skin tones. Then we mixed another neutral for the background. (Some classes mixed the background on day 2)
Day 2: Using self portrait mirrors, students traced pencil lines and added details for our self portrait with water soluble oil pastels. We used cups of water and paintbrushes to soften the lines of the pastels. I encouraged them to add layers.
Great results!
Sunday, March 25, 2012
Abstract Expressionism & Mark Rothko
Fourth Graders explored Abstract Expressionism painting by studying the works of Mark Rothko. Ideas for this lesson came from the book Great American Artists for Kids by MaryAnn F. Kohl and Kim Solga. We used color bleeding tissue paper for the first part of lesson. The students decided on a mood or feeling for their painting and chose colors they believed would represent that. We let the tissue paper dry and saturate the paper. In part two of the lesson, students used water soluble oil pastels and water blend and add layers. I was able to let a couple of classes add more tissue paper layers with diluted glue too. I love the results of this lesson! It created a very powerful display.
Primary Caterpillars and Secondary Butterflies
Kindergartners learned about primary and secondary colors using liquid tempera paint. I also tied in Eric Carle's The Hungry Caterpillar and the life cycle of a butterfly.
Stained Glass Hearts
Stained Glass Hearts!
I just took the time to photograph these beautiful stained glass hearts that my second graders completed just in time for Valentine's Day last month. This is one of those projects I just can't get enough of- it's SO easy with incredibly gorgeous results. The materials couldn't be more simple- scraps from the laminater and permanent marker I learned this easy stained glass technique from my now retired mentor, Winifred Bonner.
Here's what we did:
Day 1:
1. I passed out photocopies of the large heart shape to each student. Students chose one shape from a selection of stencils and traced overlapping shapes to fill their heart.
2. Next, we taped a piece of laminating film (I put a box in the teacher workroom for to collect large scraps) over the design.
3. Students begin coloring in the shapes with colored sharpies- being careful to find the "new" shapes made from the overlapping.
Day 2:
1. Finish coloring the inside of the heart shape with colored sharpie.
2. Trace around all shapes with black sharpie.
3. Cut around heart shape.
I usually run the hearts through the laminater to so that I can get them displayed quickly and to protect the marker. The students have a blast making these and everyone at school always enjoys the result!
Thursday, March 15, 2012
Hot Dogs & Cool Cats
LOVE this lesson!!! Kindergartners learn two new color families: warm & cool colors.The title of this lesson is as old as dirt but I put my own spin on the execution with one of my favorite techniques-- taking a wet paintbrush to watercolor markers. Easy to finish in one 45 minute class too!
Steps to create this lesson:
1. Introduce warm and cool color families.
2. Fold a 12"x18" piece of drawing paper in half. I usually have this ready before students come.
3. Draw eyes, nose, mouth, ears and whiskers at the top of the paper with a sharpie.
4. Draw paws and claws at the bottom of the paper with sharpie.
5. Add lots of lines (don't color) using warm colored washable markers for the "hot dog" and cool colored washable markers for the "cool cat". Fill up the whole dog and cat all the way down to the paws.
6. Pass out cups of water and paintbrushes and let students paint over thier marker lines- encourage them not to go overboard so they don't lose the TEXTURE!
That's it! Easy as pie! It doesn't get much cuter than this.
Wednesday, March 14, 2012
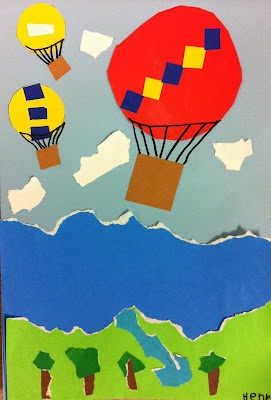
Hot Air Balloon Shape Collage


First graders just finished these colorful hot air balloon collages. We were learning about organic and geometric shapes. I love how they turned out!
Day1: We talked about organic or free-form shapes. Students tore paper to create organic shapes for thier collage; clouds, mountains, meadow, and other organic details. We reviewed parts of a landscape.
Day 2: We talked about geometric shapes. Students used stencils and scissors to add hot air ballons to the collage. We reviewed the art element of space and used size and overlapping to show that some balloons were closer to us in the artwork.
I have to say, I was very impressed with what the first graders came up with! So many creative details! Their expertise at showing near and far in this collage landscape blew me away!!
Subscribe to:
Posts (Atom)